
Adobe introduced a new generation of cloud CMS with Adobe Experience Manager as a Cloud Service at the end of 2019. This is one of the biggest changes in the CMS industry that will reshape the entire CMS landscape.
Content Management Systems in the cloud will be the future standard. Are you ready to make the switch?
Making the switch may be a big step for you and your organisation and you might have questions:
- Is your current CMS “cloud-ready”?
- Is Adobe Experience Manager as a cloud service the right CMS for you?
- What are the benefits of moving your CMS to the cloud?
- What challenges might you face?
- What are the steps required to move to the cloud?
Today, we are going to have a look at Adobe Experience Manager as a Cloud Service, why it’s a market leader, and why it’s so different to the solution you are using right now.
Using a Cloud CMS requires a mindset shift in the way you implement CMS and website projects.
A new mindset and a new agile project approach enable you to migrate your existing CMS over to Adobe Experience Manager as a Cloud Service in less than 3 months.
Are you ready?
Table of contents
- Is your current Content Management System ready for the cloud?
- What is Adobe Experience Manager as a Cloud Service?
- The benefits of Adobe Experience Manager as a Cloud Service for your company
- A quick go-live and constant innovation
- A lean approach to moving your CMS to the Cloud
- Move to Adobe Experience Manager as a Cloud Service step by step
- Move your CMS to the Cloud
- What is Adobe Cloud Manager?
- Once you are live, optimise
- Why you should move to the cloud now
- Your very next step: preparing the move to the cloud
Is your current Content Management System ready for the cloud?
You might think that your current CMS is ready for the cloud. You could simply take your current solution and “push it” to the cloud.
To judge if your current CMS is ready to offer a real cloud service, you could simply ask yourself (or your CMS vendor) the following questions:
- How can your website scale based on traffic automatically?
- What is the availability of your current solution? Is it 99,99%?
- Are you always on the latest version or are you running 2-3 versions behind?
- How can you innovate and deploy new features fast?
The idea of a cloud service is that the infrastructure layer is abstracted. You only focus on what matters: customer experience management.
Let’s have a look at a cloud-native CMS with Adobe Experience Manager as a Cloud Service.
What is Adobe Experience Manager as a Cloud Service?
Adobe Experience Manager as a Cloud service (or AEM Cloud Service in short) is a new generation of the Adobe experience management platform.
Despite offering a similar authoring experience and features than the managed service version of the content management system, AEM Cloud Service is a native cloud product that has been designed and developed for cloud purposes.
With AEM, the marketing team gets to manage the customer experience. The tool’s content management features help organise content and assets centrally.
The digital experience can be orchestrated from a single content hub. Personalised experiences can be delivered through various channels such as the website, mobile app, or e-commerce.
AEM Cloud Service is software-as-a-service – not another CMS repackaged in a cloud-like infrastructure.
The solution has many great features and key criteria such as:
- AEM Cloud Service is always on the latest version.
- AEM Cloud Service is scalable.
- AEM Cloud Service is always up and running.
The CMS can now automatically scale based on website traffic. There also is an authoring cluster now. This means that authors won’t see any downtime when an upgrade happens.
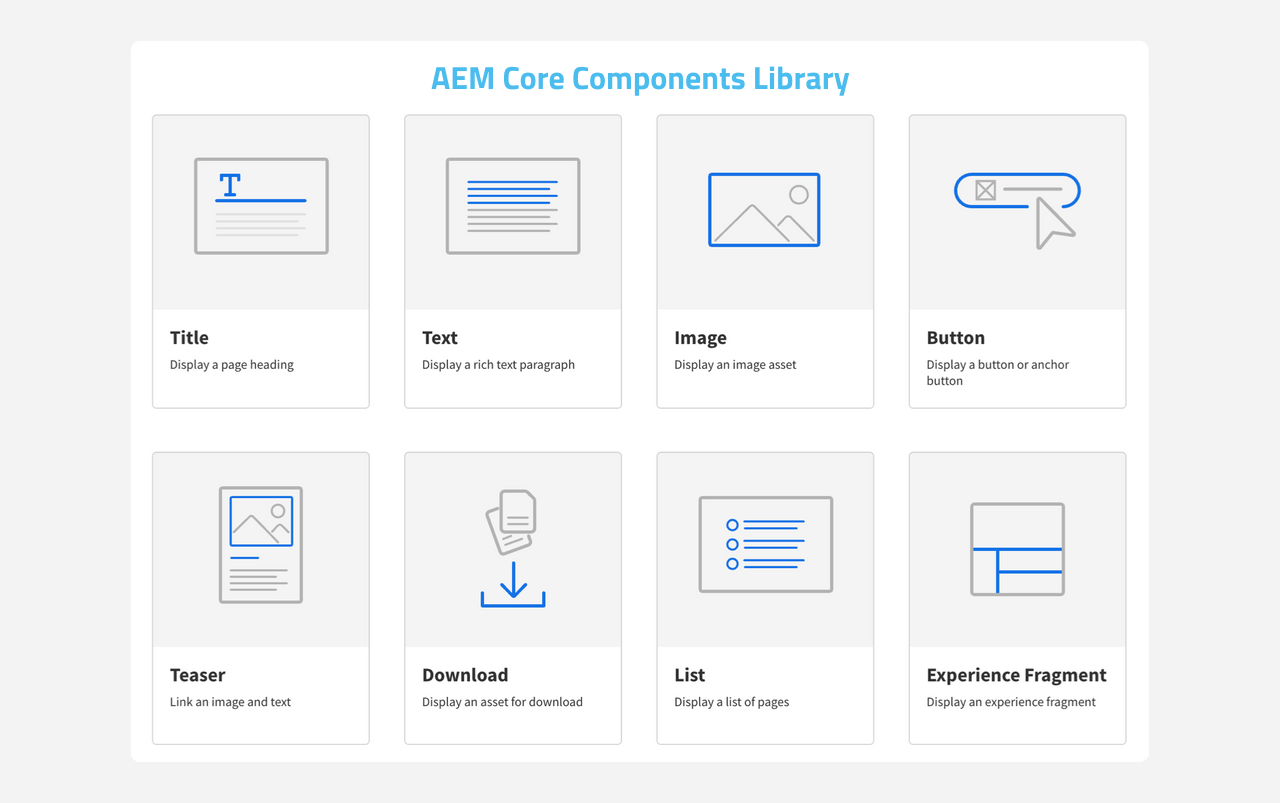
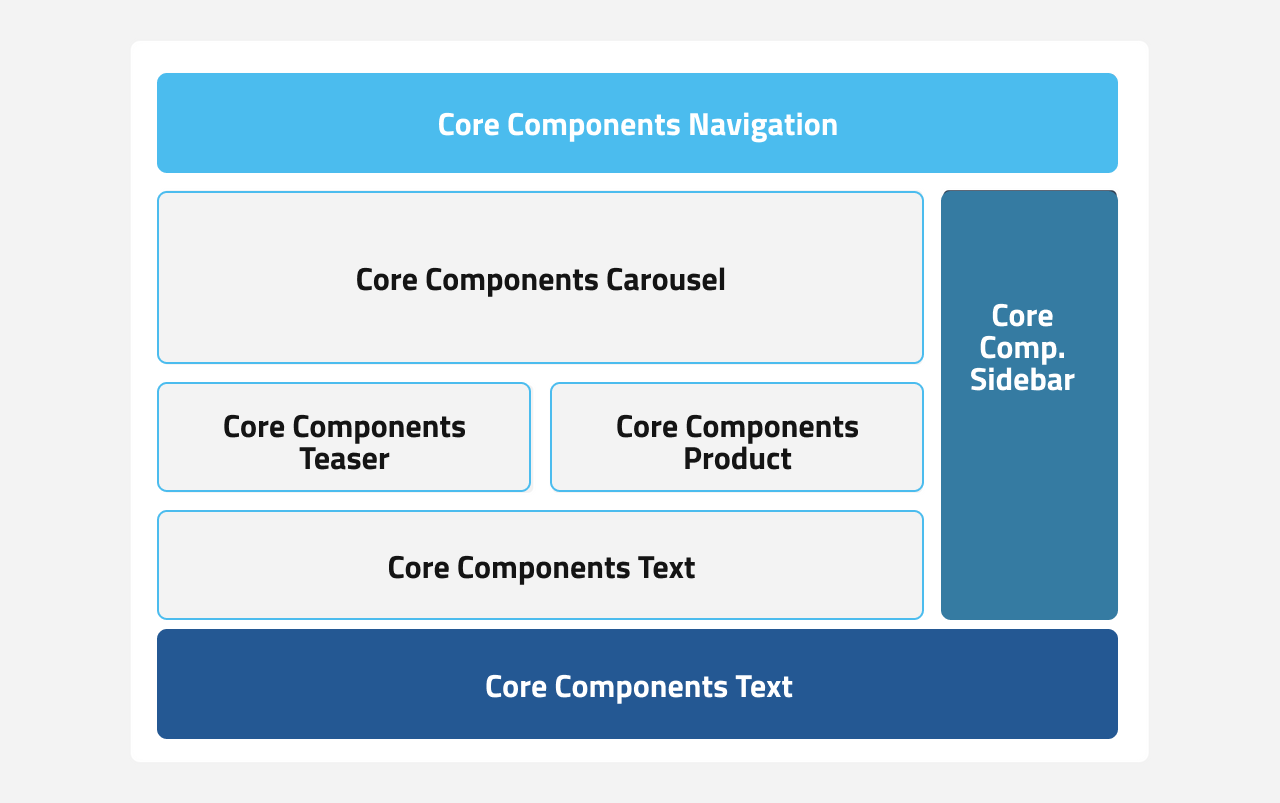
These components are built to be flexible and can be assembled to produce nearly any kind of layout.
From our expertise, 80% to 90% of usual components on a website can be implemented with a core component and a bit of styling.
As you can see below, the teaser components come with four variations that cover most use cases.
If something is missing, you can still customise a core component, extend a core component with additional functionality, or for complex scenarios, create a component from scratch (the old school way).
Adobe Core Components are open source, and you can find them on Github.

To summarise, the Core Components offer a standard approach and have many advantages:
- Design-agnostic: data, logic and design are completely separated
- Stylisation: they can be styled in different ways
- Flexibility: they offer a wide range of functionality
- Future-proof: they guarantee compatibility with future versions of AEM
How to use the AEM Core Components
To understand the design process and the people, profiles, and roles involved in this process, it’s important to get a better understanding on how to use, extend, and customise Core Components.
We won’t go too much into the technical details, but it’s important that the anatomy of an AEM Core Component is understood.
Understanding the architecture of a Core Component
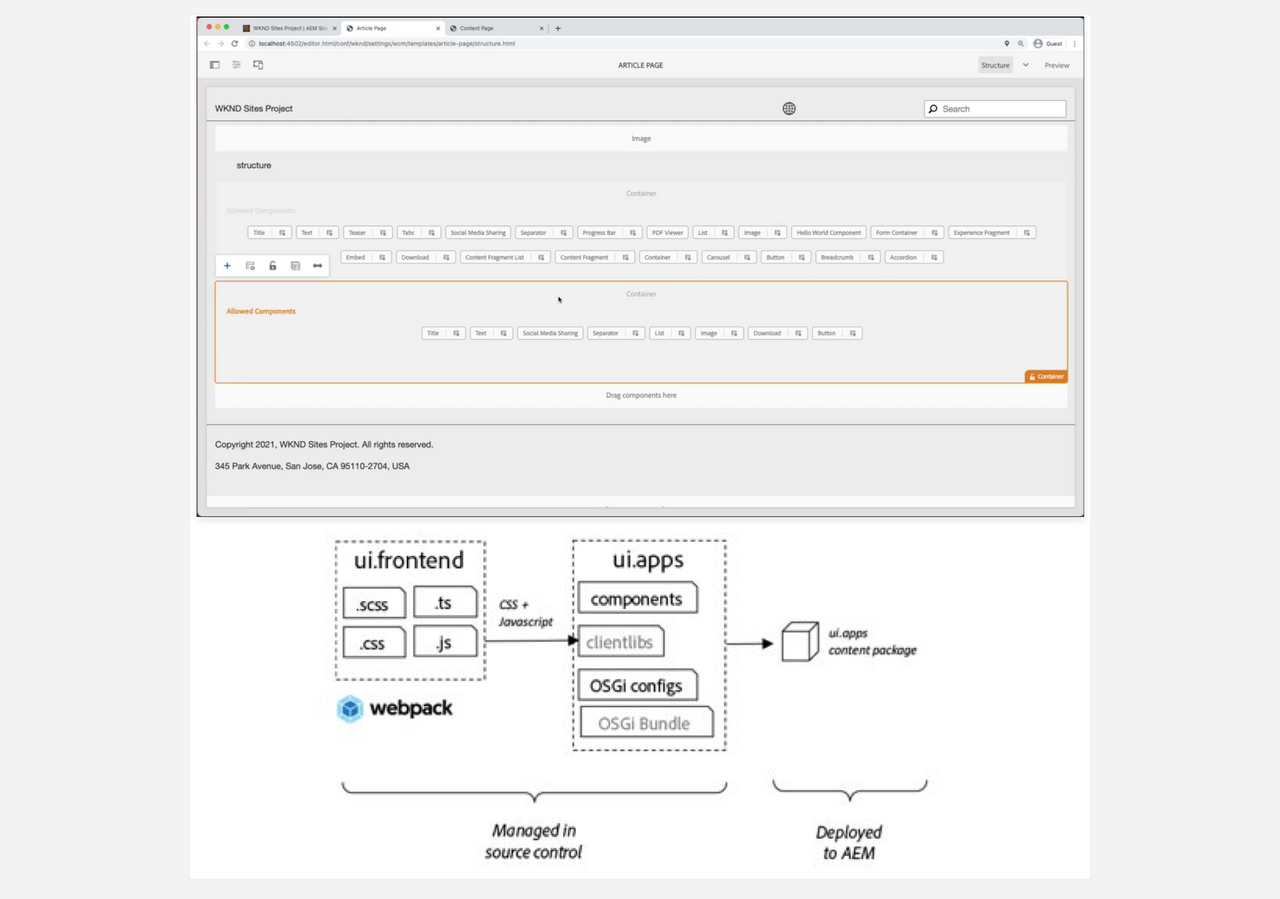
To make it simple, a core component can be split into two distinct parts: the backend part and the frontend part.
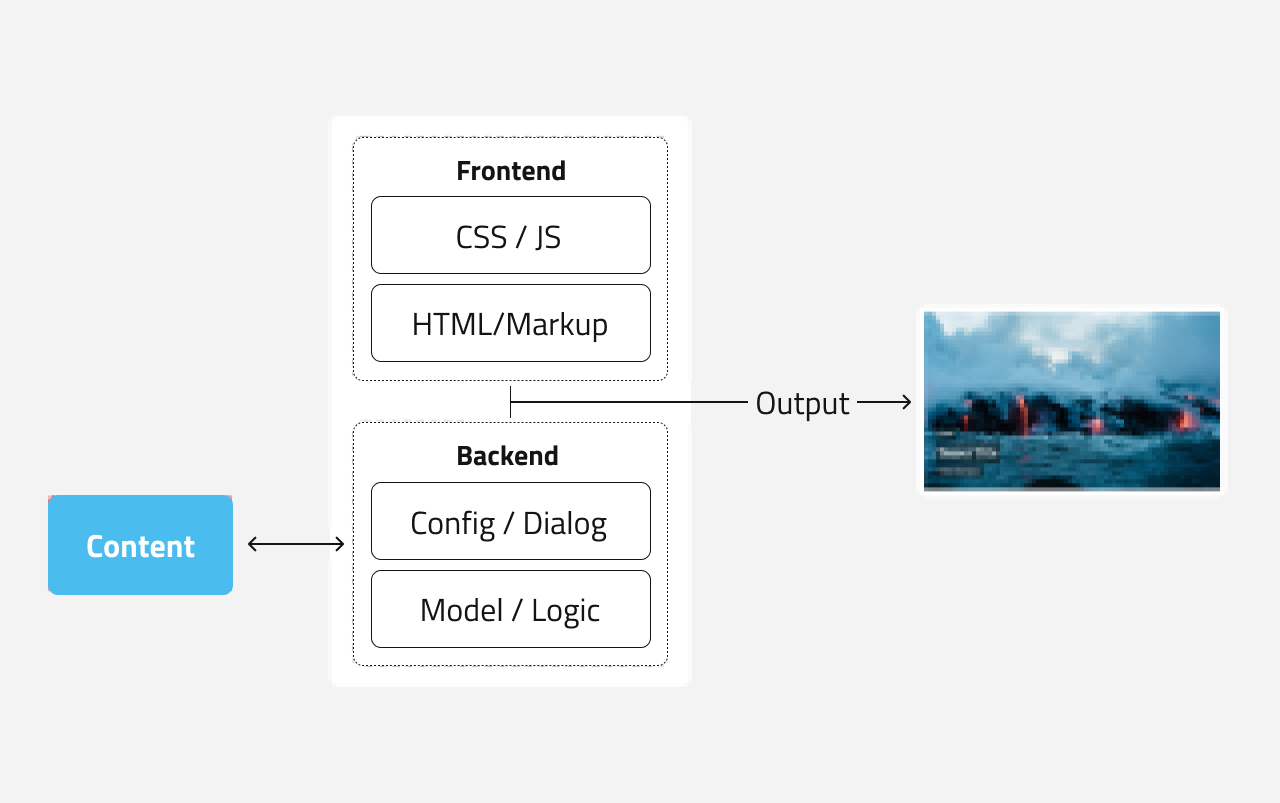
The backend contains:
- The content model. It defines the structure of the content that can be stored in a component: for example, a teaser might consist of a title, an image, a short description text and a link to the target.
- The configuration of the components and the edit dialog. These elements let you define what to display, and what an editor can edit, and the options he can use.
- The logic behind the preparation of the content for frontend (also called view).
The frontend part will be in charge of generating the output in HTML:
- A markup language (HTL) is used to bring together content from the backend and HTML elements.
- CSS and JS are used for the styling and effects applied on the elements.
(We use on purpose layman terms, if you want more specific information, jump to the official and technical documentation of Adobe.)
Customising a Core Component
Yes, a core component can be customised. You can extend them to match your requirements and avoid starting custom development from scratch.
However, a word of advice. To keep all the benefits and guarantee upgrade compatibility, some best practices and customisation patterns must be followed:
1 ) Never modify the code directly. Instead, extend the existing logic:
The architecture of a Core Component allows you to extend the content model, dialog, and logic of a component and allow an editor to use additional content.
For example, you might want to add a “category” field to a certain teaser. All you have to do is extend the teaser with a text element “category“, and define how the editor shall use it in the dialogue, and how it shall be represented in the HTML output.
2) Style the components by applying your own CSS styles:
Core Components follow a standard naming convention inspired by Bootstrap to make it easy for an experienced frontend developer to apply the website’s branding.
You can read more about customization patterns here.
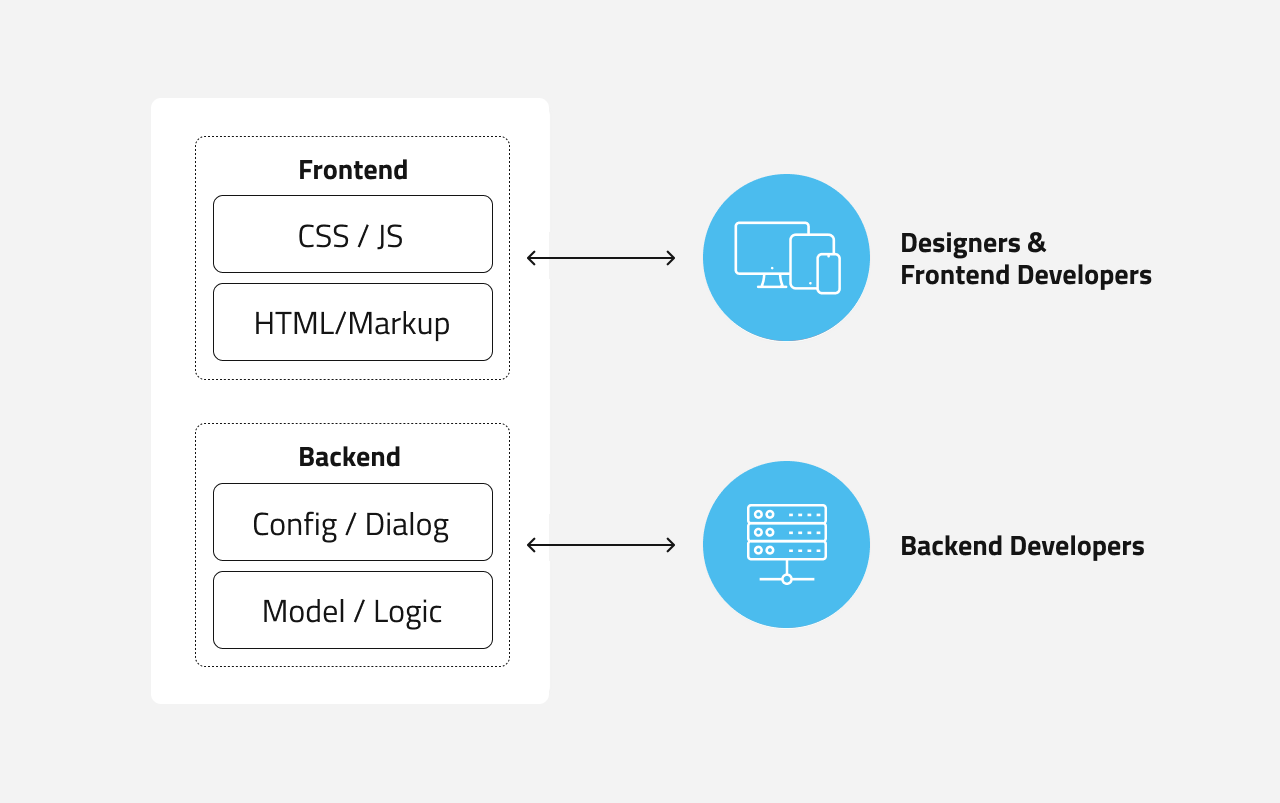
Roles in your team
The customisation patterns tell us what kind of profiles or roles you need in your website project team to guarantee smooth operation.
Basically, you will need two types of roles:
- An AEM backend developer in charge of the configuration and extension of the backend logic of the core components.
- A frontend developer mastering CSS and JS who could apply any look and feel to the HTML structure offered by the Core Components.
We do believe that customisation can be reduced to its minimum and even be avoided if you start designing your website with Core Components in mind. More about this later.
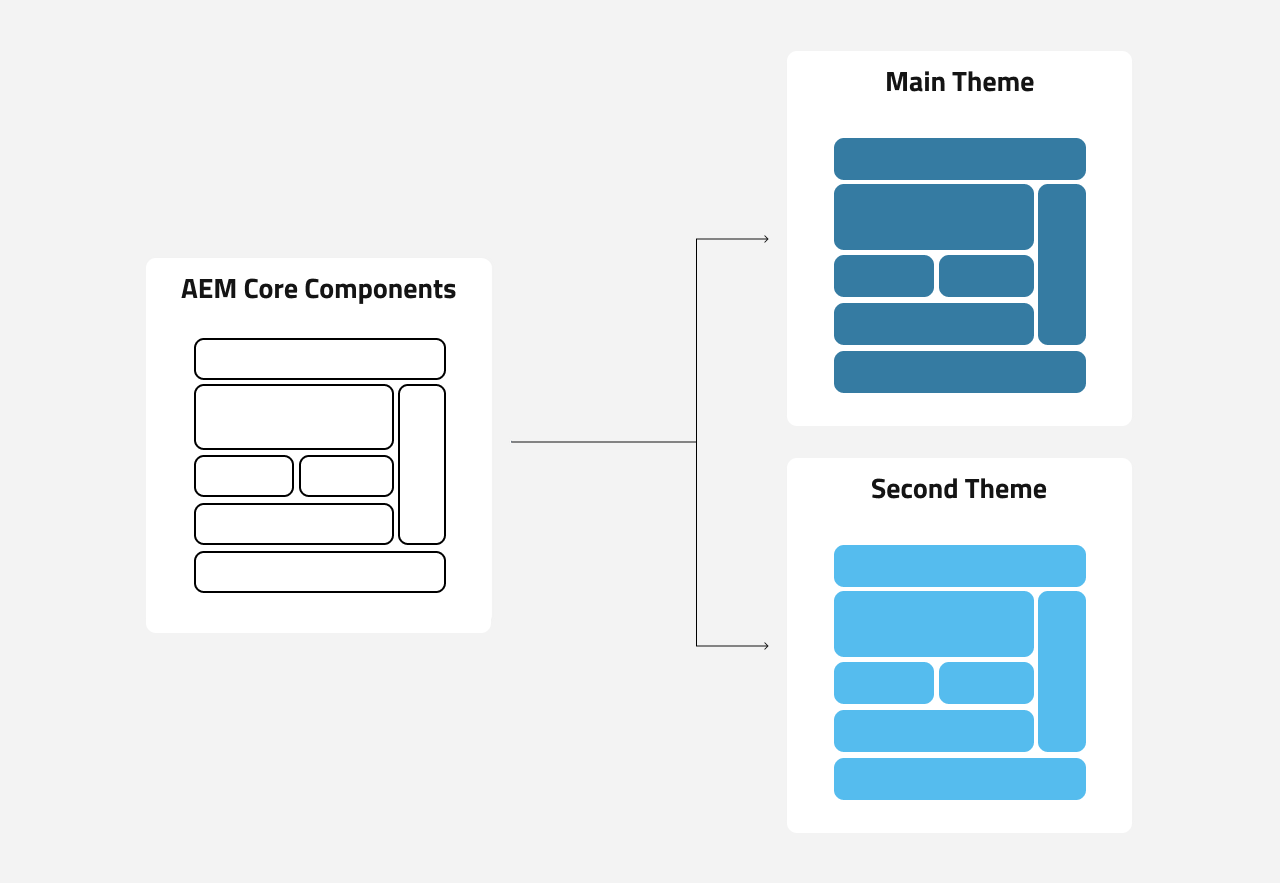
Managing design at scale with a flexible system
The frontend developers will play a key role in the implementation process. Once they master the Core Components and style system, the sky will be the limit.
Just by adapting the style of the component, multiple themes could be created for various websites, microsites, landing pages, and more.
And the beauty is: the Core Components stay the same.
You simply adapt their style and assemble them in a new manner for different websites. By setting up a versatile set of components for your digital presence together with various themes, you will be able to manage design and website at scale.
But how can this be achieved? This is what we tackle now, and outline how to design with the Core Components in mind.
AEM design workflow with Core Components
Now that the concept of Core Components is clearer, we can detail the design workflow.
We will answer the following questions:
- How to design a website with AEM using Core Components
- How to design a website with AEM without compromise
- How to design a website with AEM and go live fast
We will cover two scenarios. One when the UI/UX of the website is not done yet, and the second when you already have the design of the website ready.
You may be doing a migration of an existing website to AEM, and therefore want to migrate your existing website first and apply changes later.
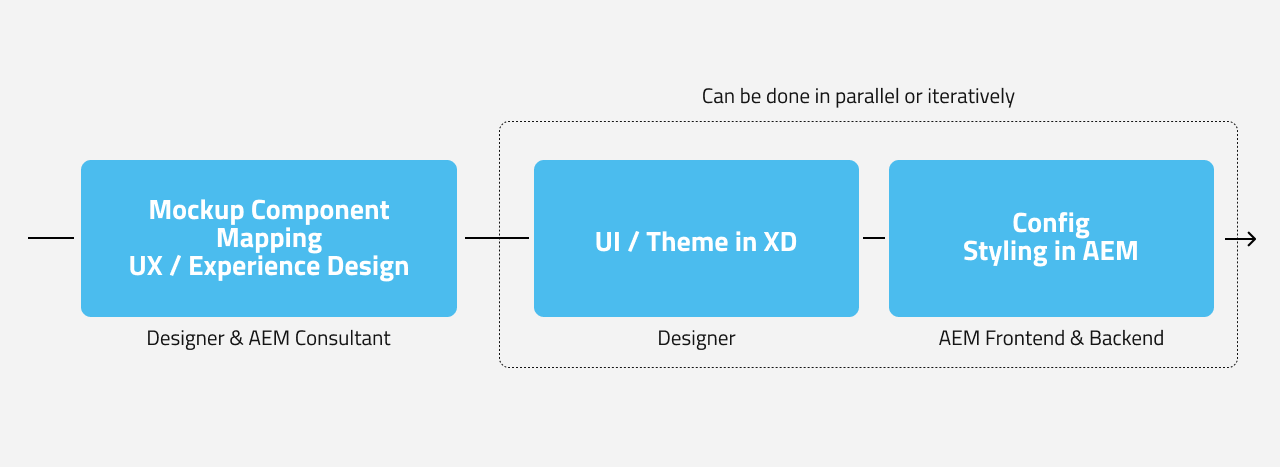
Step 1 – Map the mockup to Core Components
In our first scenario, the design of the website is not defined yet. We start with a blank page.
The two main recommendations are:
- Plan the design based on the Core Components
- Set up a team made of designers and AEM consultants
It’s crucial to take the Core Components into account from the beginning. We recommend you involve AEM experts from day one, as they will guide you through this process.
In other words, don’t leave the designer alone in a room and once the design is ready, hand it over to the AEM experts and developers for implementation.
This often leads to unconceivable user experiences that don’t leverage the solution, coming with additional cost, escalations and frustrations.
A common misunderstanding is that a framework restricts the design process. But in fact, it’s the opposite. Talking to an AEM expert will open new perspectives and will unleash the full potential of AEM.
Together the designer and the AEM Expert will define a mockup including the main page templates and components to use. This guarantees that you get the best AEM has to offer.
In the scenario where the design of your website is ready, for instance if you are migrating to AEM as a Cloud Service, you should start with component mapping.
An AEM expert will analyse the building blocks of your current website and map it to Core Components.
With this scenario, there might be some trade-offs:
- Changing the current blocks on your website to map with the Core Components layout and feature. Let’s imagine that you have a teaser with 4 CTA while the teaser Core Component offers only 2 CTA. Here you could decide to adapt your requirements to the Core Components.
- Or, if your requirements are not adaptable, the solution would be to create a custom component, extending the Core Component that fits your current UX and UI.
Anyway, for both scenarios, the goal is to have a mockup of the website where all elements are represented by Core Components.
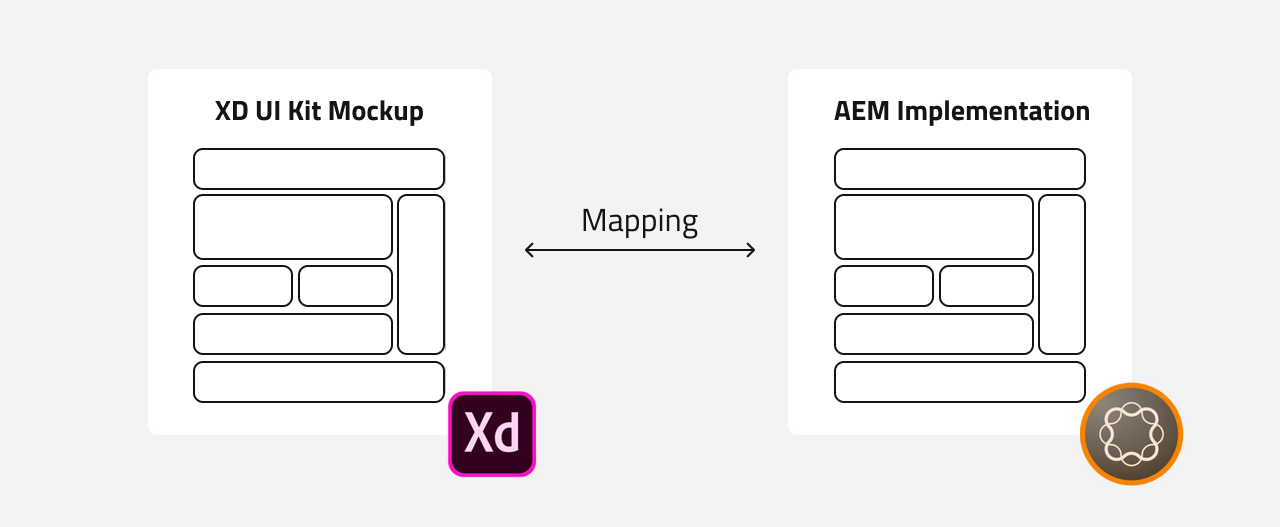
Step 2 – Design in Adobe XD
Adobe XD is a design tool.
With Adobe XD, designers can now design based on the out-of-the-box AEM Core Components, and consider how different styles can be implemented via AEM’s style system.
Adobe created an UI Kit for AEM Components.
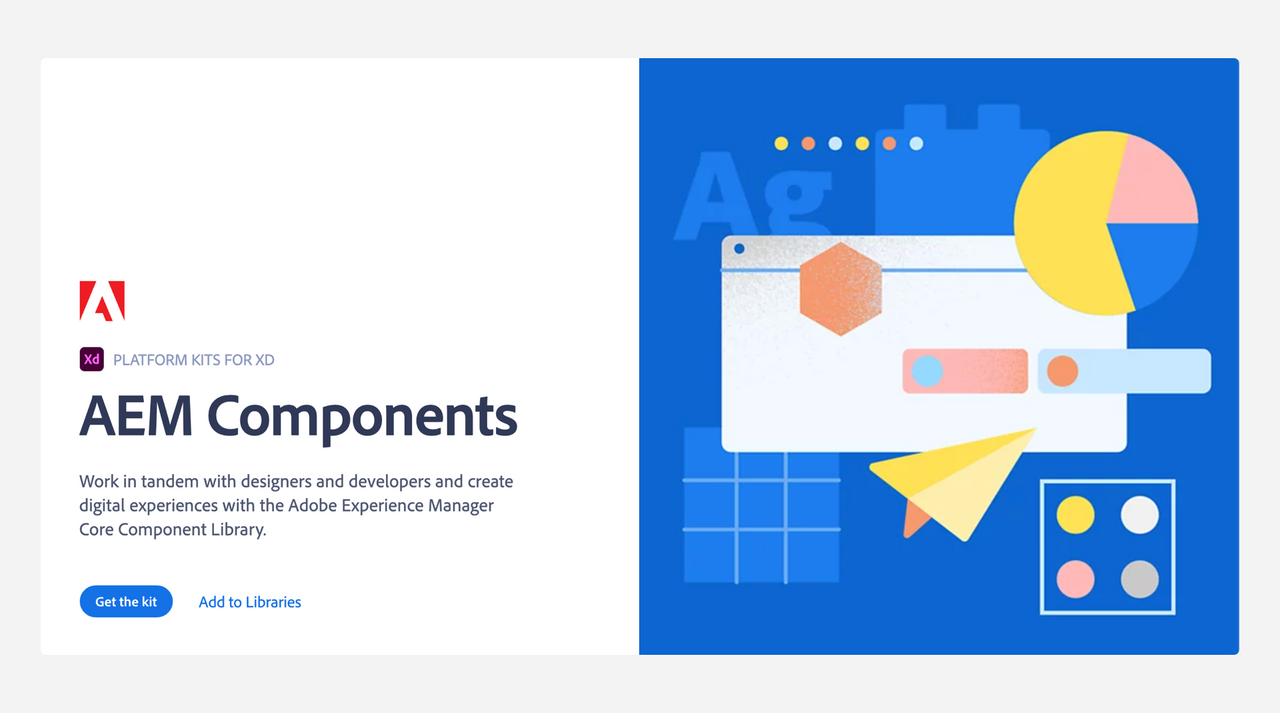
By using the premade UI Kit based on AEM Core Components, unnecessary design deviations are avoided, namely the kind of deviation that requires more development effort and involves extra cost.
The steps for the designer are the following:
- They will assemble the Core Components based on the mockup which will create the layout for the different pages.
- They will then start styling each component based on the visual identity of the website and branding guidelines.
By following this approach, the backend developer will have an easier time configuring everything in AEM. Layout structure will represent a page template in the CMS.
It’s crucial that the website design stays in sync with the Core Components.
A similar process can be done in the case of scenario 2.
Step 3 – Configuration and style in AEM matching the mockup
While the designer will adapt the look and feel of the Core Components in Adobe XD, a AEM backend developer can start the configuration of the page templates and components in AEM.
This can be done in parallel as both work on the same basis – the defined mockup.
As soon as the design is ready and validated, a frontend developer can start working and applying the right style, CSS and JS to the core components.
Everything is bundled into AEM and ready to be deployed.
Overview of the AEM styling workflow
To recap, here are the main steps of the design workflow with AEM and Core Components:
- Define a mockup based on the Core Components
- Create the UI and theme in Adobe XD
- Configure the page templates and components, then style the Core Components in AEM
And do not forget, a critical aspect is to have a mixed team made of designers and AEM experts from the very beginning.
Core Components: AEM Cloud Service’s best companions
Even though the Adobe Core Components were created with AEM 6.3 before the release of AEM Cloud Service, they perform best when used together with the cloud version of Adobe CMS.
One of the main purposes of AEM Cloud Service is to enable fast innovation and help you focus on what matters most: building outstanding customer experiences.
With AEM Cloud Service you don’t need to care about servers, IT operations, network, security etc. anymore.
Leveraging Core Components gives you additional benefits by speeding up the design and development phase.
Quickly assemble the building blocks to realise a mockup, and then style them with limited backend development.
This is the best way to tackle any AEM as a Cloud Service project, and will enable you to go live fast, while guaranteeing upgradability.
Finally, build enterprise websites faster with AEM Cloud Service and Core Components
Designing for AEM with Core Components is close to what you are already doing for other projects. You leverage a framework that enables you to build something faster.
The key element is to design with the Core Components in mind and to involve an AEM expert at the very first stage of the design process.
The expert will guide you through the process and indicate the best way to use the components to avoid potential limitations.
This article is part of a series of content about AEM Cloud Service, where we explain how to move to AEM Cloud Service.